This article is a guidelines of how to repair big cuts on ship launching airbags, include preparation of repair tools and repair material, repair procedure and how to evaluate the repair result.
Repair big cuts is quite different with repair holes on marine airbags. Here the big cut refers to thorough cut more than 10 cm length. In some extreme cases, marine airbags may be cut into two pieces.
First of all , customer need to know after repair those marine airbags with big cuts will have to be used with lower pressure normally 50-80% percent of rated pressure. So before repair, an evaluation is necessary, if the airbags with low pressure is needed? If yes then go on with repair.
Repair tools
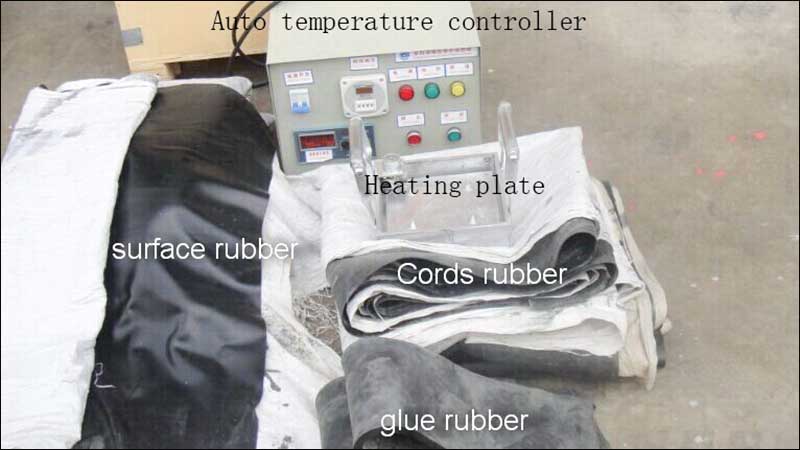
- Airbag repair kits: Include heating plate and auto temperature controller and tools for repair operation
- Angle Grinder: Grind the cuts on ship launching airbags
- Hydraulic Jacks: To press heating plate tightly with rubber patches
- Bracket: To enable hydraulic jacks press heating plate with rubber patches
- Brush: Brush glue onto patches and cuts on ship launching airbags
- Steel plate and blocks: To enable hydraulic jacks press heating plate with rubber patches.
- Steel plates need to put atop heating plates
- Big size Needle with cords: To sew the cut with cords
- Sand bags: Put sand bags between ship launching airbags and bracket
Repair Material
Three kinds of rubber material: Surface rubber, cord rubber sheets and glue rubber
Glue: Cut glue rubber into pieces and mix them with premium gasoline with the weight ratio (1:5 glue /rubber to gasoline)
Isolating cloth: To isolate heating plate with rubber patches
Repair Procedure
Step 1– Clean and grinding
Clean and grind the cuts with angle grinder.
Mark the mending area and grind. For crack more than 20 cm long, grinding area should be 26 cm wide, 15 cm longer than crack length. For small crack grind area can be 20 cm wide and 15 cm longer than crack length. For hole with bigger than 5 cm diameter, grind area should be 26 cm diameter. For small hole people can grind 20 cm diameter area.
Grinding should only get rid of the rubber and not damage cords layers.

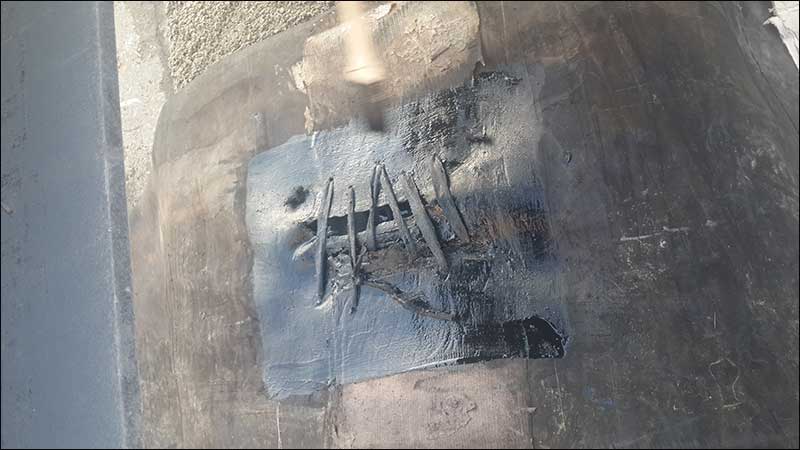
Step 2 –Sewing the cut
Sew cuts with needle and cords.
Stitch the crack with synthetic cords which can be get from the cord rubber sheet. The stitch should be 2-3 cm far from crack and has the space of 3-4 cm.
Step 3– Seal cut with surface rubber strip
Wash the mending area with gasoline and wait it to be dry.
Brush the glue to the mending area and wait the glue to be dry.
Cut a strip of surface rubber to seal the cut. The strip should be 1 cm wider (each side) than the wound.
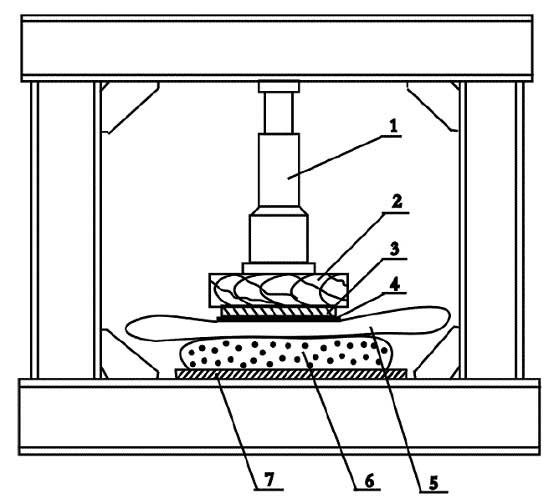
Step 4 –Prepare patches
The patches should be N+ 1+1 layers, N represent the layers of damaged airbags.
For example , for 6 layers airbags cut, the patches should be 7 layers cord rubber and one layer surface rubber.
Each patch layers should be brushed with glue then stacked together.
Then the whole patch will be pressed to the cut on airbags, remove possible bubbles in layers of patch.
Step 5– Put airbags into bracket
One sand bag should be put on bracket beam and under marine airbags.
Adjust airbag position ,make sure the patch are on the suitable position for jacks to press.
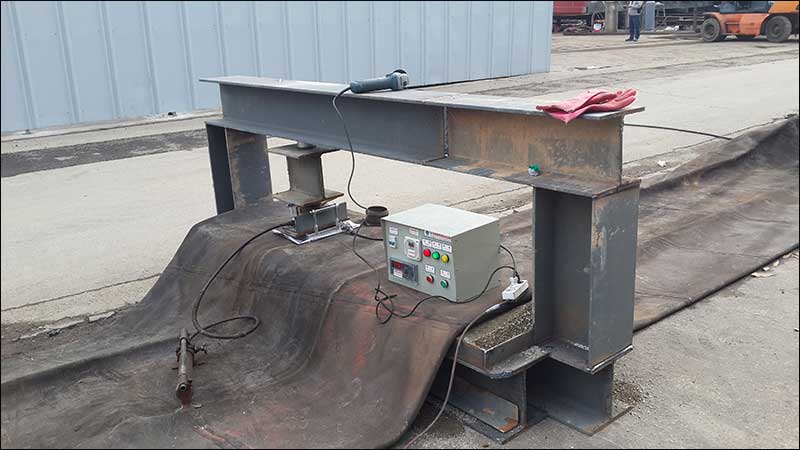
Step 6– Jacks press
Set up hydraulic jacks and press the heating plate to patches tightly. Recommended pressure of jack is 0.5- 0.6 MPa.
Step 7– Patch Vulcanization
Turn on the temperature controller and wait for the vulcanization to be completed.
For different layers in different conditions the required heating times are different. Normally the heating temperature should not exceed 160 ℃.
A vulcanization trial can start as below:
When temperature of heating plate reach 140℃ turn off the power of heating plate.
After 30 minutes turn on power again and let temperature reach 140℃ again then turn off power.
Wait until temperature of heating plate drop to 50℃ people can release airbag from the press for checking. If find patch is not vulcanized enough, then add one more 30 minutes heating.
Step 8– Airbag Repair Result Checking
The repair result checking mainly refer to the checking of patch rubber vulcanization degree. If the vulcanization is not enough the patch will be soft and sticky. In this case people need to press and heat the patch again.
If vulcanization is too much the patch will get burnt and chaps. In this case people need to get rid of the patch and do the repair work again.
Reference link: http://eversafemarine.net/how-to-repair-a-hole-on-airbags/


